> ## Documentation Index
> Fetch the complete documentation index at: https://docs.glowstudio.ai/llms.txt
> Use this file to discover all available pages before exploring further.
# Creating Users
Adding users to your client organizations is a crucial step in setting up effective client management in GlowStudio. This guide will walk you through the process of creating and managing users for your client organizations.
## Accessing User Management
Go to the `Client` tab in your GlowStudio dashboard.
Find the **client organization** you want to manage from the list on the left.
Click the `Manage` button next to the organization name.
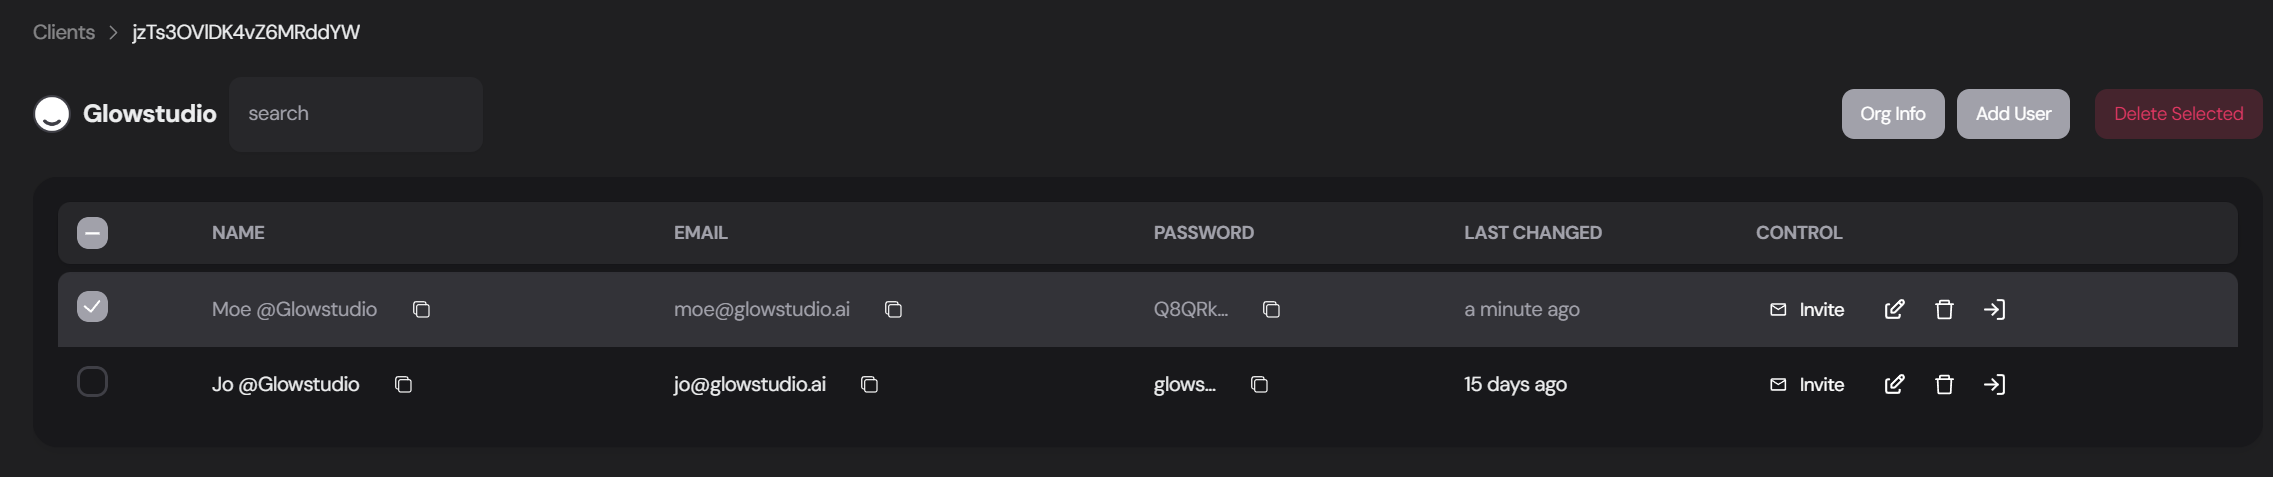
Initially, the user table will be empty. This is where your client's **team members** will be listed once added.
 ## Adding a New User
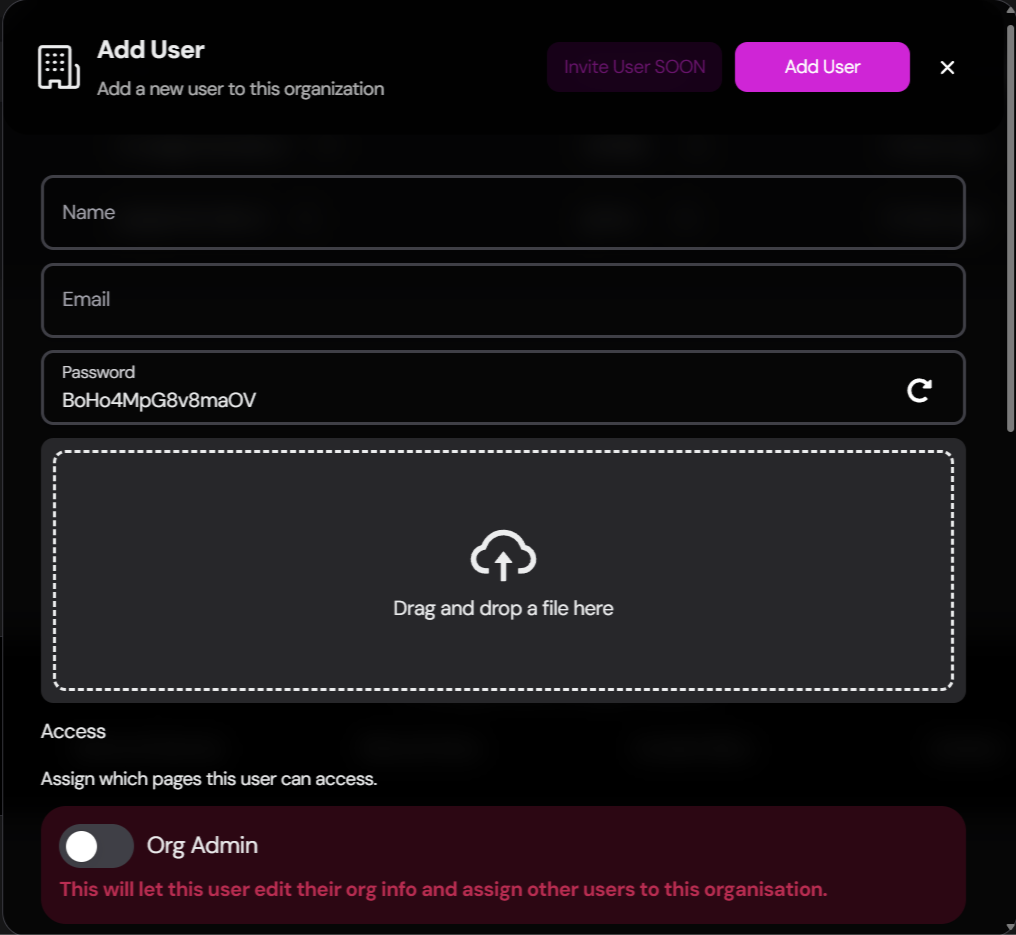
Click the `Add User` button in the top right corner of the user management screen.
Fill out the necessary information for your client:
* **Full Name**
* **Email Address**
* **Password** (You can either set a custom password or click the `Generate` button for a random secure password)
* **Profile Photo** (Optional - select or drag and drop an image)
**Remember:** Request the correct information from your client about which email and name they want. The client will always be able to set their own details later.
Configure the user's access levels by selecting the appropriate checkboxes:
* `Org Admin`: Allows the user to edit organization info and create/invite new users for their team.
* `Home`: Access to the dashboard overview
* `Conversations`: View and manage chat transcripts
* `Analytics`: Access to widget statistics
* `Knowledge Base`: Ability to view and edit the KB
* `Channels`: Manage connected channels
* `Prompt`: Adjust the prompt, AI-model, UI-engine settings and more.
* `Settings`: Modify the widget settings. This is a selection of the settings found in your agents settings tab.
* `Custom Tab`: Access to any custom tabs you've created. See [custom tab]() docs for more info.
#
**The settings above are the same as the agent designer. If you want to learn more about the dashboards features, [click here]()**
#
We know agencies want heavier permission options. More premission customization options **COMING SOON**. We will also release a dedicated doc explaining the **settings tab**.
Click the `Add User` button to create the new user account.
## Adding a New User
Click the `Add User` button in the top right corner of the user management screen.
Fill out the necessary information for your client:
* **Full Name**
* **Email Address**
* **Password** (You can either set a custom password or click the `Generate` button for a random secure password)
* **Profile Photo** (Optional - select or drag and drop an image)
**Remember:** Request the correct information from your client about which email and name they want. The client will always be able to set their own details later.
Configure the user's access levels by selecting the appropriate checkboxes:
* `Org Admin`: Allows the user to edit organization info and create/invite new users for their team.
* `Home`: Access to the dashboard overview
* `Conversations`: View and manage chat transcripts
* `Analytics`: Access to widget statistics
* `Knowledge Base`: Ability to view and edit the KB
* `Channels`: Manage connected channels
* `Prompt`: Adjust the prompt, AI-model, UI-engine settings and more.
* `Settings`: Modify the widget settings. This is a selection of the settings found in your agents settings tab.
* `Custom Tab`: Access to any custom tabs you've created. See [custom tab]() docs for more info.
#
**The settings above are the same as the agent designer. If you want to learn more about the dashboards features, [click here]()**
#
We know agencies want heavier permission options. More premission customization options **COMING SOON**. We will also release a dedicated doc explaining the **settings tab**.
Click the `Add User` button to create the new user account.
 We recommend assigning the **first user** as the `Org Admin`. This allows them to manage their organization and add other team members as needed.
## Managing Existing Users
Once users are added, you have several options for managing them:
1. Find the user you want to edit in the table.
2. Click the `Edit` button on the far right of their row.
3. Update the necessary information in the edit form.
4. Click `Save` to apply the changes.
Deleting a user will remove their account and all associated data. This action **cannot be undone**.
1. Find the user you want to remove in the table.
2. Click the `Delete` button on their row.
3. Confirm the deletion in the prompt that appears.
## Inviting Users to the Client Dashboard
After creating a user account, you can send an invitation for them to access their dashboard:
Before sending an invitation, use the `Log in` button to view the dashboard as the client would, ensuring all settings and permissions are correct.
Find the newly created user in the user management table.
Click the `Invite` button on the user's row.
Review the invitation details and click `Send Invite` to email the user their login information.
The invitation email includes a link that **automatically** logs the client into their dashboard. Ensure the email address is correct before sending.
## Best Practices for User Management
Periodically review user accounts to ensure they are up-to-date and all access levels are appropriate.
Encourage clients to change their passwords upon first login and to use strong, unique passwords.
Inform users about their access levels and any changes made to their accounts.
Grant users only the permissions they need to perform their roles to maintain security.
## Related Documentation
Explore these related topics to further enhance your understanding of GlowStudio's whitelabel features:
Learn how to create and manage client organizations.
Understand how to configure access levels for client users.
Explore the features available in the client-facing dashboard.
Master the process of onboarding clients to their new dashboard.
We recommend assigning the **first user** as the `Org Admin`. This allows them to manage their organization and add other team members as needed.
## Managing Existing Users
Once users are added, you have several options for managing them:
1. Find the user you want to edit in the table.
2. Click the `Edit` button on the far right of their row.
3. Update the necessary information in the edit form.
4. Click `Save` to apply the changes.
Deleting a user will remove their account and all associated data. This action **cannot be undone**.
1. Find the user you want to remove in the table.
2. Click the `Delete` button on their row.
3. Confirm the deletion in the prompt that appears.
## Inviting Users to the Client Dashboard
After creating a user account, you can send an invitation for them to access their dashboard:
Before sending an invitation, use the `Log in` button to view the dashboard as the client would, ensuring all settings and permissions are correct.
Find the newly created user in the user management table.
Click the `Invite` button on the user's row.
Review the invitation details and click `Send Invite` to email the user their login information.
The invitation email includes a link that **automatically** logs the client into their dashboard. Ensure the email address is correct before sending.
## Best Practices for User Management
Periodically review user accounts to ensure they are up-to-date and all access levels are appropriate.
Encourage clients to change their passwords upon first login and to use strong, unique passwords.
Inform users about their access levels and any changes made to their accounts.
Grant users only the permissions they need to perform their roles to maintain security.
## Related Documentation
Explore these related topics to further enhance your understanding of GlowStudio's whitelabel features:
Learn how to create and manage client organizations.
Understand how to configure access levels for client users.
Explore the features available in the client-facing dashboard.
Master the process of onboarding clients to their new dashboard.