> ## Documentation Index
> Fetch the complete documentation index at: https://docs.glowstudio.ai/llms.txt
> Use this file to discover all available pages before exploring further.
# Voice to voice
> Enhance your AI agents with natural voice interactions using the VAPI integration
In the era of advanced AI and Large Language Models (LLMs), voice interactions have reached unprecedented levels of naturalness. Glowstudio harnesses this technology by integrating with VAPI, a cutting-edge voice-to-voice platform, to provide your agents with lifelike conversational abilities.
Voice-to-voice technology now incorporates natural speech patterns, including filler words like "mhmm" and "ya", making conversations feel more authentic. Users can even interrupt the AI mid-sentence, closely mimicking human-to-human interactions.
This guide will walk you through setting up your VAPI profile and enabling voice-to-voice capabilities for your Glowstudio agent.
## Connecting to VAPI
Start by creating an account on VAPI. It's a straightforward process - simply head over to [VAPI's website]().
We love VAPI. For more detailed information, check out their [documentation](https://docs.vapi.ai/introduction).
Once your account is set up, create an assistant on VAPI:
* Choose from various voice providers (e.g., Elevenlabs, Cartesia, OpenAI)
* Select a voice that fits your agent's persona (For instance, our agent Gia uses the "Hannah" voice from Cartesia)
* Craft a well-formatted system prompt. Need help? Check out our [comprehensive guide](agent-creation/system-prompt/Overview)
After setting up your assistant:
1. Navigate to your profile in the left-hand corner
2. Go to `API keys`
3. Copy both your **private** and **public keys**
**In Glowstudio:**
1. Go to the `credentials tab`
2. Paste your VAPI private and public keys in the appropriate fields
3. For the Default Server URL secret, go back to VAPI, find it under settings > `Server URL`, and paste it in Glowstudio's credentials tab
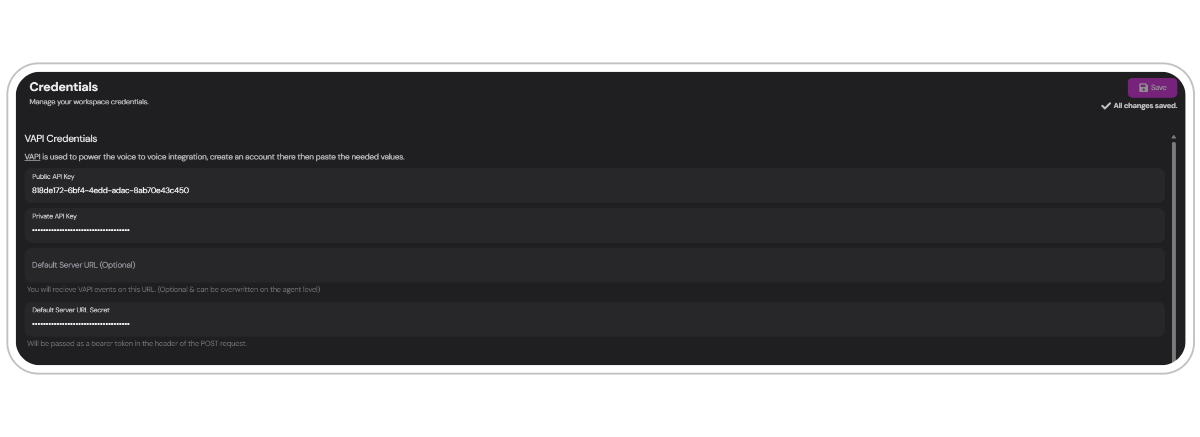 ## Integrating with Your Agent
Now that you've set up VAPI, it's time to enable voice capabilities for your Glowstudio agent:
Choose the agent you want to set up for voice interactions and navigate to the channels tab.
Click the `Voice setup` button or click `connect` via the voice channel.
If set up correctly, you'll see a green checkbox as shown below:
## Integrating with Your Agent
Now that you've set up VAPI, it's time to enable voice capabilities for your Glowstudio agent:
Choose the agent you want to set up for voice interactions and navigate to the channels tab.
Click the `Voice setup` button or click `connect` via the voice channel.
If set up correctly, you'll see a green checkbox as shown below:
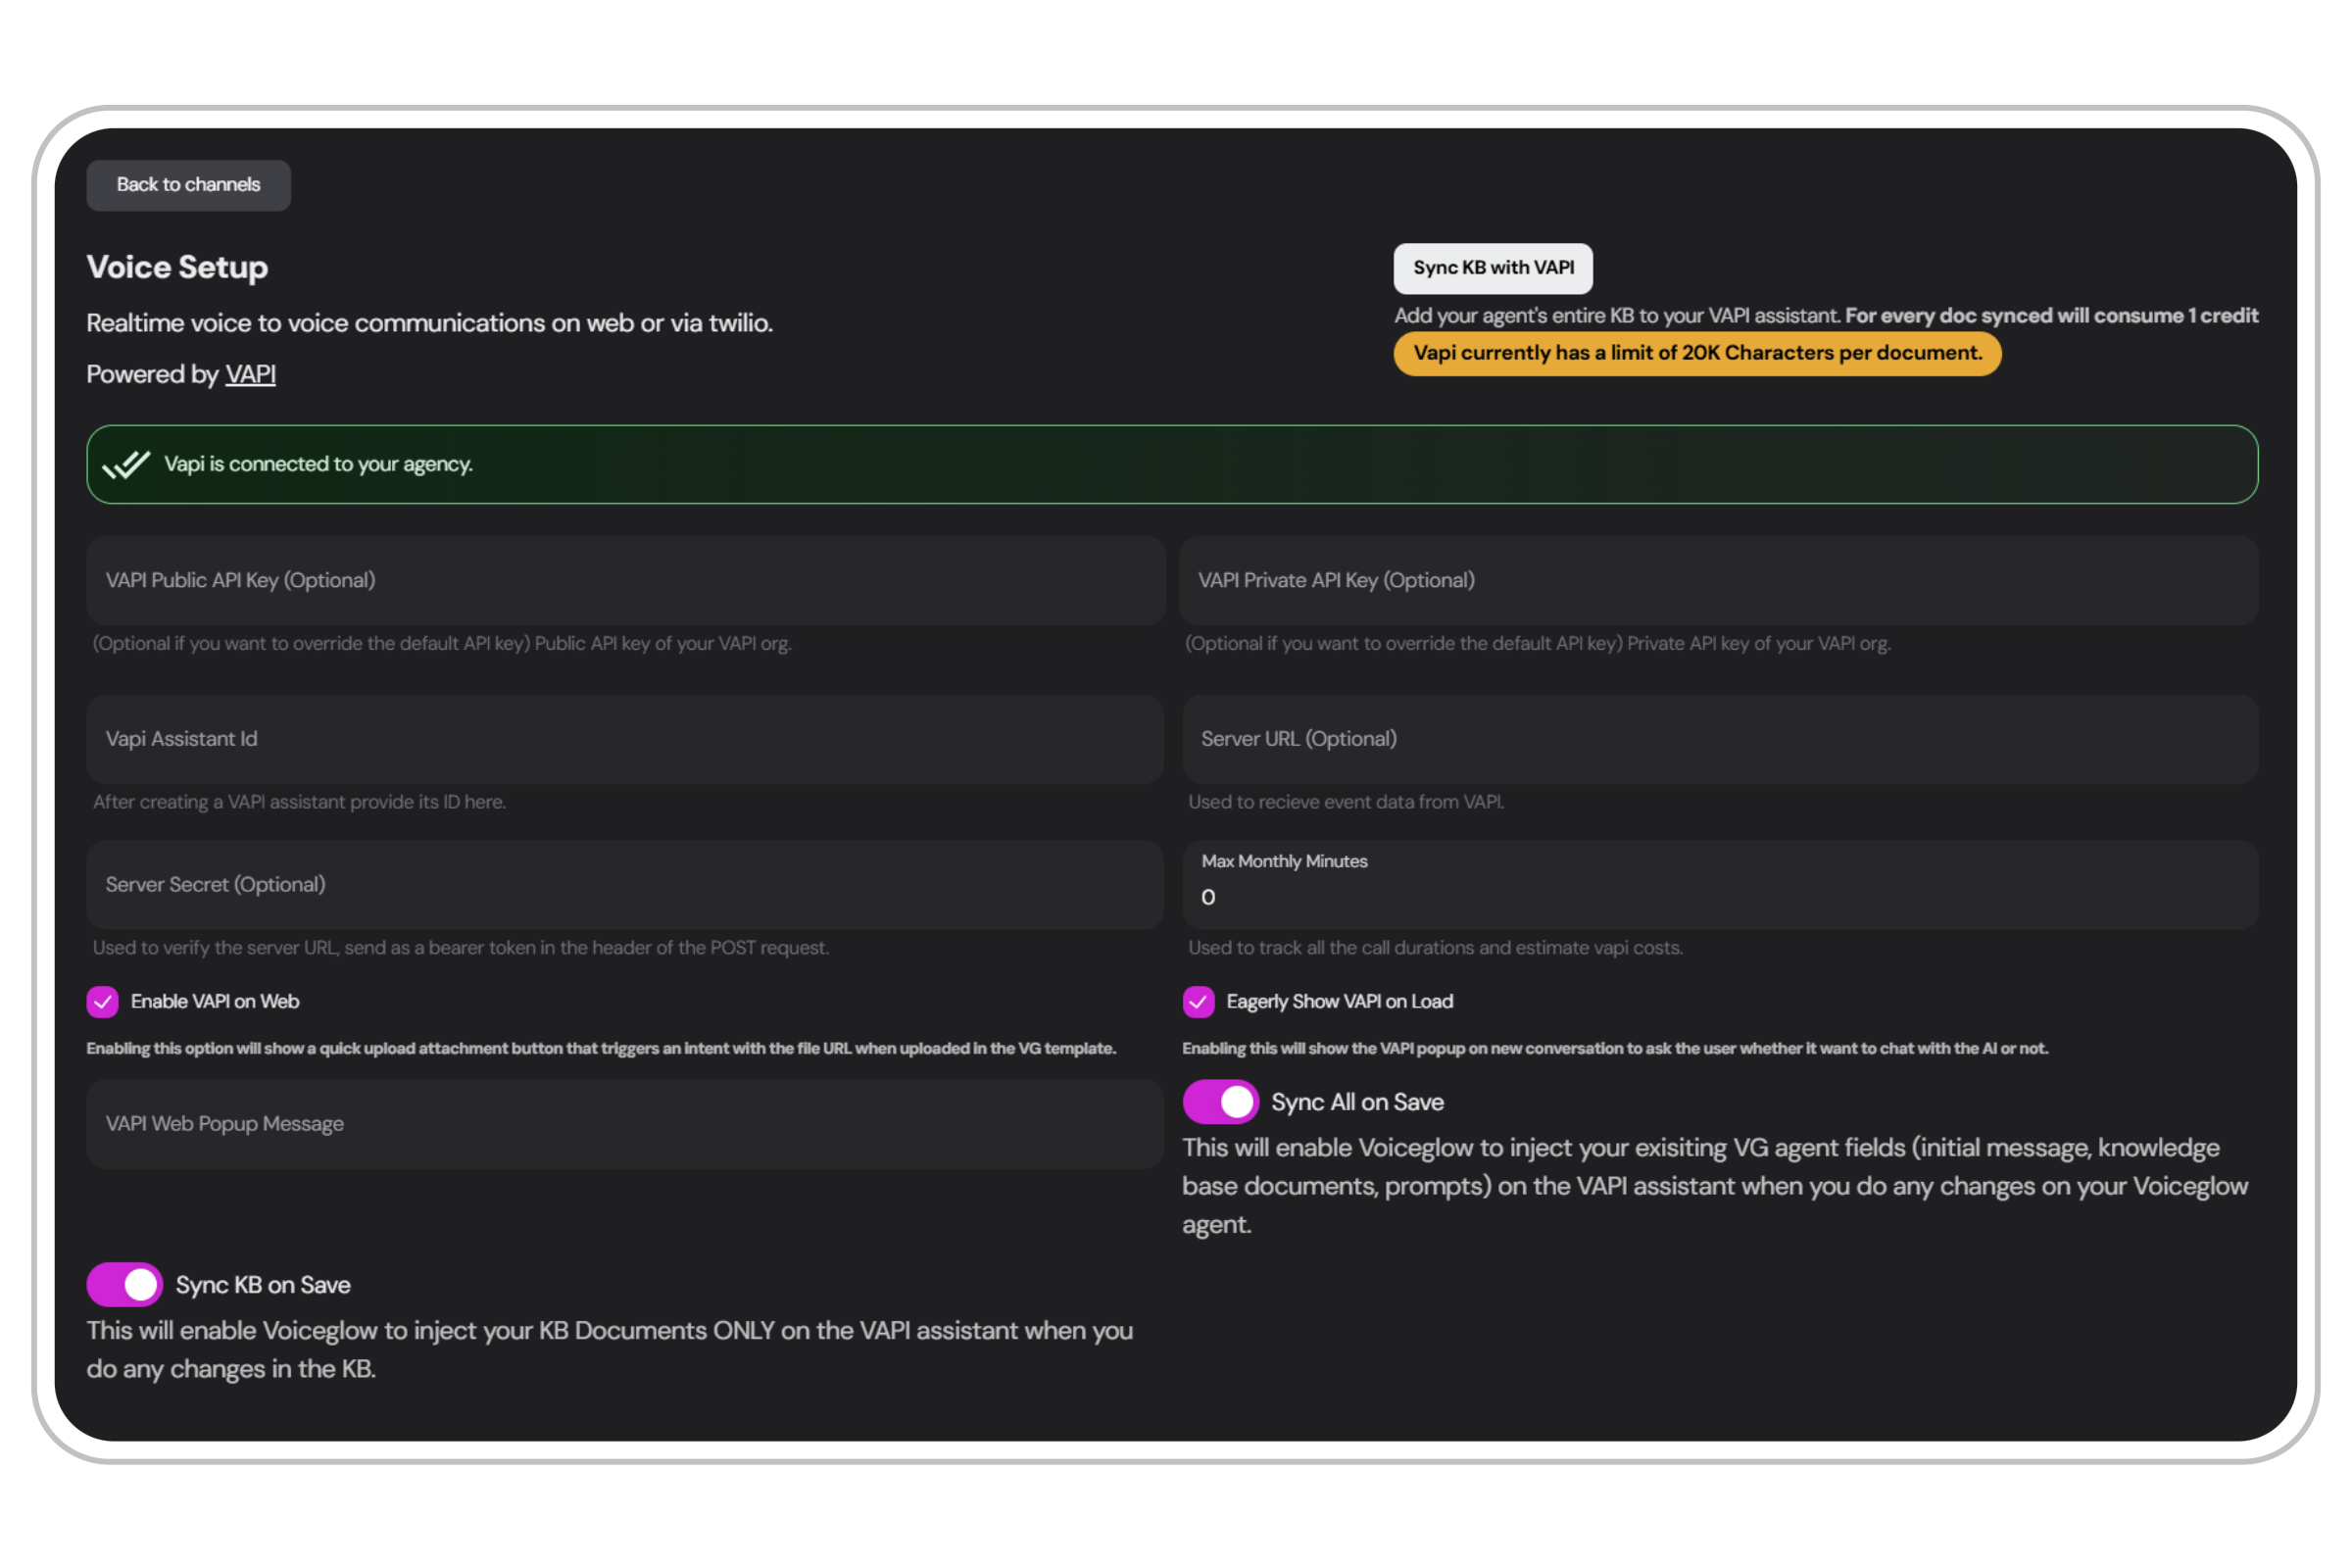 The last field you need to fill out is the `VAPI assistant ID`. You can find this in your VAPI dashboard - simply copy it from your assistant's details.
You've successfully set up voice-to-voice capabilities in Glowstudio, offering your users or clients an innovative way to interact with your brand.
During a live conversation with the VAPI agent, the interaction is **transcribed** and is added to your current conversation. You can review these transcripts in the [conversation tab](/features/conversations-tab) for later.
## Voice Integration Settings
The voice setup interface provides several options to customize how VAPI interacts with your agent:
**This option adds your agent's entire Knowledge Base (KB) to your VAPI assistant.**
* Each synced document consumes `1 credit`
* Glowstudio will inject your KB documents into the VAPI assistant whenever changes are made to the KB
VAPI currently has a limit of **20,000** characters per document.
**Enable this to automatically update your VAPI assistant with changes made to your Glowstudio agent, including:**
* Initial message
* Knowledgebase documents
* System prompt
**When enabled, this option displays the VAPI popup at the start of a new conversation, asking the user if they want to talk with the AI.**
> See it in action:
This option adds a quick upload attachment button to the Glowstudio template. When a file is uploaded, it triggers an intent with the file URL in Voiceflow. Read more about the voiceflow integration [here](/integration/voiceflow).
**You can customize the VAPI Web popup message in the provided input field.**
If you want to **restrict** the usage of your VAPI assistant, this can be done by setting a limit for monthly usage.
Whitelabel user? Incldue this in your monthly subscription. Read more about setting up subscriptions in the [sales docs]() (COMING SOON)
The last field you need to fill out is the `VAPI assistant ID`. You can find this in your VAPI dashboard - simply copy it from your assistant's details.
You've successfully set up voice-to-voice capabilities in Glowstudio, offering your users or clients an innovative way to interact with your brand.
During a live conversation with the VAPI agent, the interaction is **transcribed** and is added to your current conversation. You can review these transcripts in the [conversation tab](/features/conversations-tab) for later.
## Voice Integration Settings
The voice setup interface provides several options to customize how VAPI interacts with your agent:
**This option adds your agent's entire Knowledge Base (KB) to your VAPI assistant.**
* Each synced document consumes `1 credit`
* Glowstudio will inject your KB documents into the VAPI assistant whenever changes are made to the KB
VAPI currently has a limit of **20,000** characters per document.
**Enable this to automatically update your VAPI assistant with changes made to your Glowstudio agent, including:**
* Initial message
* Knowledgebase documents
* System prompt
**When enabled, this option displays the VAPI popup at the start of a new conversation, asking the user if they want to talk with the AI.**
> See it in action:
This option adds a quick upload attachment button to the Glowstudio template. When a file is uploaded, it triggers an intent with the file URL in Voiceflow. Read more about the voiceflow integration [here](/integration/voiceflow).
**You can customize the VAPI Web popup message in the provided input field.**
If you want to **restrict** the usage of your VAPI assistant, this can be done by setting a limit for monthly usage.
Whitelabel user? Incldue this in your monthly subscription. Read more about setting up subscriptions in the [sales docs]() (COMING SOON)